SculptureFest 2011 Featured Artist’s Photo Journal

Installment 1

Step 1:
Here are the two birches that I successfully formed into the “fiddle head” shape that I chose for the sculptural elements. I made the trip back to Portsmouth without mishap, just weird looks from the passersby on Route 101. Where to find more birch trees……

Step 2: Honestly, I was a bit discouraged by my lack of success at harvesting my first birch trees. Loaded with the two that survived,I drove into the parking lot of the Button Factory where my studio is located (way up on the third floor), I was beginning to have second thoughts. However, serendipity prevailed, for just then a man stepped out of his pick-upand said lightheartedly, “I’ve got tons more of those birches if you need more!” I thought he was poking fun at me, but he was completely serious. As added encouragement to continue with my project, a friend happened to pull into the parking lot just then to help me carry the first two trees up to the third floor. I spent the next couple of weeks pretending to be Paul Bunyan and hand cut birches and hauled nineteen trees up three flights of stairs up to my studio. I then used a come-along to tension the trees into graceful curves leaving them to season as I prepared the next step….

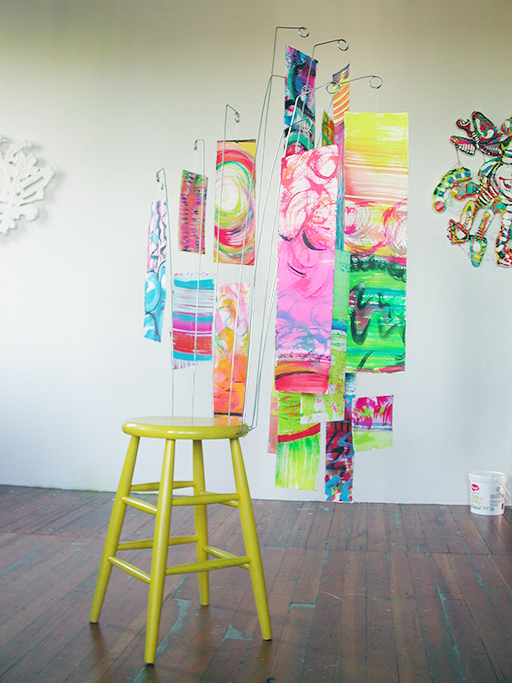
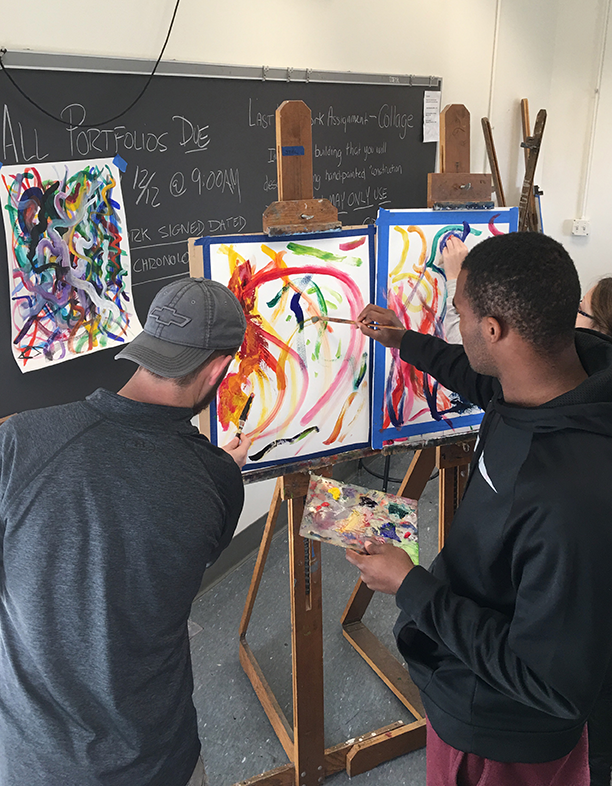
Goldenberg shown stacking a few of the birch “fiddle heads” to dry in the hall near his studio.
Installment 3:
Step three: The birch sculptural elements were stacked in the hallway near my studio and in the adjacent studio of Rita Fabbricatore, who generously offered me the use to of her space in which to store the birch ‘saplings.’ In reality, they were enormous trees. The elipses that I bent at the skinny ends of the birches had been temporarily lashed with strips of rags and clothesline rope. Each elipse had to be lashed permanently with 1/4″ manilla rope. I used a technique called shear lashing and then whipped the end of each lash with fine waxed thread. There were hundreds of these to do. Once this task was completed, the birch fiddle heads could then be left to dry….but not for long….
Step four: These birch trees were ungainly to handle. I had already moved each tree about five times. Each elipse was to contain a two-sided painting. I had chosen watercolor paper. Yes, that is right, watercolor paper. (a fellow participant a SculptureFest 2011recently quipped that I just wanted to make the project “a little more dicey!” So now the task at hand was trace each elipse onto watercolor paper. One by one I laid the trees out on the floor in the hallway and traced the approximate shape of each painting onto the paper. There were 19 birch elements, two of which had two elipses because I had taken advantage of a fork in the tree. The total number of elipses was 21, making forty-two paintings that I had to create. I had alotted about two and one-half weeks to accomplish this step.


Pictured above are the roughed out pieces of watercolor paper that Goldenberg traced with magic marker directly from the elipses he (channeling Paul Bunyan) bent in the birch trees. They are ready to paint!


Goldenberg is painting the images with Zootie the Remarkable Cat casting a critical eye. Below left: In progress paintings with some elipses still untouched.


Goldenberg used every available space in his studio; the floor, walls and table tops. Not all of the watercolor pieces could be laid out at one time. He had to cycle through them, rearranging their placement in cue.
Installment 4:
Step five: Now that the paintings are complete, Goldenberg used the magic marker tracing as a guide to tear the paintings to their final size. Carefully using a bone folder, thumb and forefinger, he carefully tore the painting about an inch inside of the marker line to created a delicate, translucent deckled edge. Now each painting and birch tree sculptural element had been catalogued with a number, letter and color swatch to indicate their appropriate pairings. One by one, Roger set-up a sculptural element across sawhorses in the long hallway and began custom fitting each painting to their appropriate birch tree and began the delicate process of easing each painting permanently into place. Each painting was lashed with a multitude of .05mm waxed thread and thread tied with special slip-proof knot.


Pictured left and right are two examples of the finished paintings that have yet to be torn to size thereby creating a translucent deckled edge to finish the edge of each painting.

Above is one of the birch sculptural elements laid across the hallway work station. Roger used two saw horses to support the length and weight of the tree, while laying the bent end across a portable work table. The curved elipses became the support structure and graceful frame for the individual paintings. In the left edge of the image one can see the 4 foot long PVC pipes eight and 10 inches in diameter, that were prepared by Goldenberg to become the swivel bases for this kinetic sculpture.


A couple more pictures of the fitting process for the paintings.
Step six: After three weeks the paintings had all been fastened to the birch ellipses and hundreds upon hundreds of knots had been tied. While tying knots Goldenberg had time to plan the next step–varnishing the paintings to complete the weatherproofing process. Roger devised a rack ‘n’ stack system that utilized the same old saw horses and some two by fours. He was able to set up this staging in the hallway and in Rita Fabbricatore’s studio. This sixth step involved hand painting each of the 42 paintings with five coats of varnish. By the penultimate coat, Roger enlisted the help of Beth Liguori. Her enthusiasm, moral support and skill made lighter work of this pains- taking task and energized Roger to put on a fifth and final coat for safe measure.
Here are a views of one of two varnishing stations. The birch tree sculptural elements areresting and fastened into place, ready to be coated with the special weather proofing varnish. A total of five coats were painstakingly applied,with careful attention paid to coating the threads, the apertures through which they penetrated the watercolor paper, and to every square centimeter of the paintings.


Here are a views of one of two varnishing stations. The birch tree sculptural elements areresting and fastened into place, ready to be coated with the special weather proofing varnish. A total of five coats were painstakingly applied,with careful attention paid to coating the threads, the apertures through which they penetrated the watercolor paper, and to every square centimeter of the paintings.


The second varnishing station that Goldenberg erected in his neighbor’s studio.
<<close-ups of the second varnishing station. Here one can see the means by which the paintings were fastened to the birch elipses and the manilla rope shear lashing that secured the bent birch. Below \/

Installment 5:
Step seven: Below is a slide show documentary of loading the 26 foot U-Haul for the journey to Woodstock, VT, the location of SculptureFest Vermont. The fact that Goldenberg has his studio on the third floor of a building with no elevator added a huge amount of extra hauling not only to get the work out of the building, but to get the materials in in the first place. So, this part of the project deserves notice here, especially because of the huge support the Roger received from friends when his call went out for helping hands…


The maw of the truck ready to be loaded! Notice the stash of shorter sculptural elements awaiting helping hands. Beth Liguori is the first of my help to arrive. My true bro Tim Griffin arrives with some more muscle! We begin hauling the elements down three flights of stairs to the U-Haul.


I am describing how to handle the sculpture parts as the ellipses that hold the painted watercolor paper are very vulnerable before finally being assembled on-site. Tim, Beth and I begin to ‘escort’ th birch tree sculpture parts down the hallway and through narrow door into the stairwell. STAIRWELL; THIRD FLOOR! A TIGHT FIT!


We used our bicycling road-riding skills to work together as a team and to ease the pieces down the stairwell. As each element was lowered, the top person would skip down to the next staircase to receive the descending artwork.


This is the first birch tree element to descend to the truck. A new member of the crew arrives. Matt Langley, brother of the twelve tones! Look at the dwindling stack o’ birches!


To move a birch element down the stairwell we first had to ascend to the tower, then we were able to pass the element down through the center of the stairwell.


The longest, thickest and heaviest birches were in my neighbors studio. These had to be spun around in this space to orient them correctly for descent through the stairwell. More helping hands arrived. Sculptor Tom Cowgill expertly guided a piece into the stairwell. Tom Peiffer seen here directing a descent. The capable hands of Beth Liguori guiding a birch down the stairwell. Throughout the whole affair, everyone was wondering why my studio is on the top floor of the old building…


Working its way down the three flights of stairs….. a two-fer seen here….Bill Clark, woodworker and “The First Floor Guy” lends some gripping strength and humor too!


What a long way down! Tom Cowgill handing me a LONG sculptural element to stack in the 26foot U-Haul. Tom Peiffer hefting a birch element and guiding it from the third floor.


A father and son team: Jonny Peiffer arrived on the scene to helpAlso seen here is Amanda the Sculptor; a new Button Factory Tenant.


View down the stairwell of the Button Factory at 855 Islington Street. The crew loading the last of the trees into the 26 foot U-Haul. Lengthwise there was 3 inches to spare from front to back.


OK, So this was the last piece to be loaded… Then they all had to be tied and cinched and then the yellow ropes were added in the mid-sections of the trees to prevent them from bouncing during their journey. Any vibrations or jostling would have abraded the bark and the knotted threads and the paintings themselves would have been destroyed.


All snug! The signal that we were done loading!

Well deserved refreshment after a fewhours of hauling.
I want to thank everyone who took time out of their busy work-day to help me! Thanks to Matt Langley for bringing his camera and to he and Beth Liguori for taking the time and interest to take these photos ( and haul and care). Thank you to Bill Clark, Tom Cowgill, Michael Wise, Tim Griffin, Beth Liguori, John Anderson, Jonny Peiffer, Tom Peiffer Matt Langley, and Amanda the Sculptor for their skill and applied strength.
Installment #6
Matt Langley, Beth Liguori and I drove to Woodstock, VT on Wednesday August, 17th and when we arrived we announced our arrival and figured out our approach and where to park. Matt was the official truck driver, and thanks to him for doing that. At that point in the project I didn’t feel alert enough to drive and I was needed to keep focused on the next steps of the process: unloading, staging for the assembly and the first step of the installation, installing the 10inch PVC pipe bases. Once Matt parked the 30 feet of TRUCK, we immediately began to unload its contents, organize the materials, andset up the racks to store the birch sculptural elements in the barn. Once this was accomplished we barbecued with the Davenports, uncorked some beers and the returned to Portsmouth. What a long day! Beth took her turn at the wheel of my car, Matt copiloted while I napped in the back seat. The following day I spent time cleaning the hallway and my neighbors studio, then I got some sleep that night (not much) and then drove back up to Woodstock with Matt to install the bases for the the sculpture.
Here are some pics and commentary of these next steps.
Step eight: Where to park and unload the materials.


At first we thought we would have to park and walk across a vast lawn to get to the barn for storing for the sculptural elements….Then Pete Davenport said, “Hell no, just drive up the driveway and around the barn. We had to move a couple of hanging mobiles out of the way, but it was easy street! We set up a temporary sawhorse rack to hold the birches as we emptied the first rack in the truck so we could rebuild it in the barn.


As we unloaded the elements, we laid them out in groupings according to the specific notation located on their butt ends. The notations included diameter measurements, a number to identify it and a letter of the alphabet to signify which of the six groupings it was a member. Each sculpture was to be built of three or in one case, four of the birch elements. Finally, before I left my studio, I color coded each group; red, yellow, black, dark blue, etc. for easy identification or the groupings. We laid them out in their respective groups to eliminate sorting at the time of assembly.


If you look closely, one may notice the color swatches at the butt ends of the birches……


Once in their groups, we paraded them into the barn for safe keeping…..


What a colorful array of artwork! Yummy! All tucked in for the night…..

Woooooohooooooo!!!!!!!!!!!!!!!
Step nine: First Goldenberg discussed with curator Charlet Davenport the layout of the sculptures in the 5 acre field and and then Roger and Matt Langley walked the hummocky terrain while discussing exact placement by marking the location of each sculpture with a blazing orange stake. Using modern equipment to dig the 4.5 foot deep holes…. Pete Davenport was very generous with his time throughout the installation process. He offered his farming expertise by helping with his 8″ posthole digger. What time saver that was. As it was it was backbreaking work to install the 4.5 foot long, 10 PVC piping that was to become the outer part of the swivel base for each of the 6 sculptures.


Roger Goldenberg discussing the layout of the installation with curator Charlet Davenport with another participating sculptor, Lela, contributing to the process as well. An oblique view of the site looking down from above.


Matt Langley helped Pete remove the bucket from his Kubota and attach the posthole digger.


Here, Mr. Greenjeans tromps off to the first stake with shovels, a ramrod to test for rocks, and an old style posthole digger. Goldenberg laid out plastic in which Matt had cut a 12″ hole. This plastic drape would protect the grass from the excavated soil, making its removal easier and keeping the site absolutely clean.


Aligning the tractor with the hole. It was amazing how precise Pete Davenport could be with this mammoth equipment. Beats shoveling!


Oh yeah, really beats shoveling….. And speaking of beat, no sooner had Roger reached for the manual posthole digger, he whacked his brow drawing blood. What a FACE!


With this mini Kubota trucklet Goldenberg carried tools to the installation points in the field. Seen here is the artist’s tripod of 16 foot 2×4’s, an eight foot step ladder and a grouping of the birch elements that are being lashed together at their base


Here are pics of the first two sculptural elements in place but without the final touches.
Installment #7
Final Steps: Some of the photos may be redundant. Also, the very last step was to paint the exposed PVC base pipe black. Photos were not taken of that step but that will be done in the future….you know, for the cover of Art in America or something like that…The gray flashing that caps the base should be just above the grass height by the opening and in the future the bases will be set a few inches deeper.


Here is just a process shot. This sculpture was actually blow over while I was working on it. A thunderstorm unleashed rain on the setup and the lashing holding the tripod together slipped. Goldenberg was at the top of the ladder at the time and grabbed onto the sculpture and rode it to the ground, catching the sculpture and saving it from smashing. No emergency room visit was necessary.


In the photo above, one can see the lashing technique involved and the 3′ long vertical white spacer strips that were carefully cut by Goldenberg’s sister and sanded by her to soften the sharp edges. The bottom of the sculpture was then inserted into the 4′ whitePVC tube and secured. This forms the inner part of the swivel base. The outer part is already in the ground.


Pete Davenport is the teamster, expertly wielding his tractor which is now lashed to the base of the sculpture. Pete’s grandson Griffin arrived to help me support the “art end” while we transported the finished sculpture to its underground swivel mate…


One of the underground bases was constructed out of wood. Why? It is a long story…It was more time involved but much cheaper than the PVC. The white strips at the base (seen above) were fastened on to support the flashing cap.

Views from the upper paddock and artist reception area.


Note that this base is capped and is complete with blackened PVC base. Voila’ complete! This is the tallest sculpture measuring 22′. The smallest of the sculptures is about 10′ in height. This smallest sculpture has a wooden 12 sided base. It is seen here with the flanges that will hold the metal fender.


Again! very photogenic… Lower portion of Roger Goldenberg’s installation; All of the Colors–A Visual Jazz Suite


Down slope view; 5 of 6 sculptures are viewed here. So there is documentation of the painted bases! This is complete